
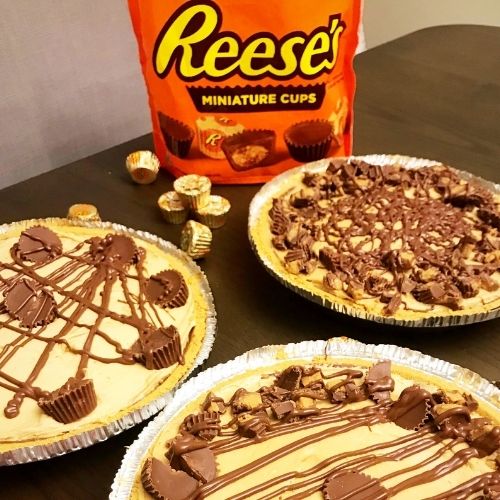
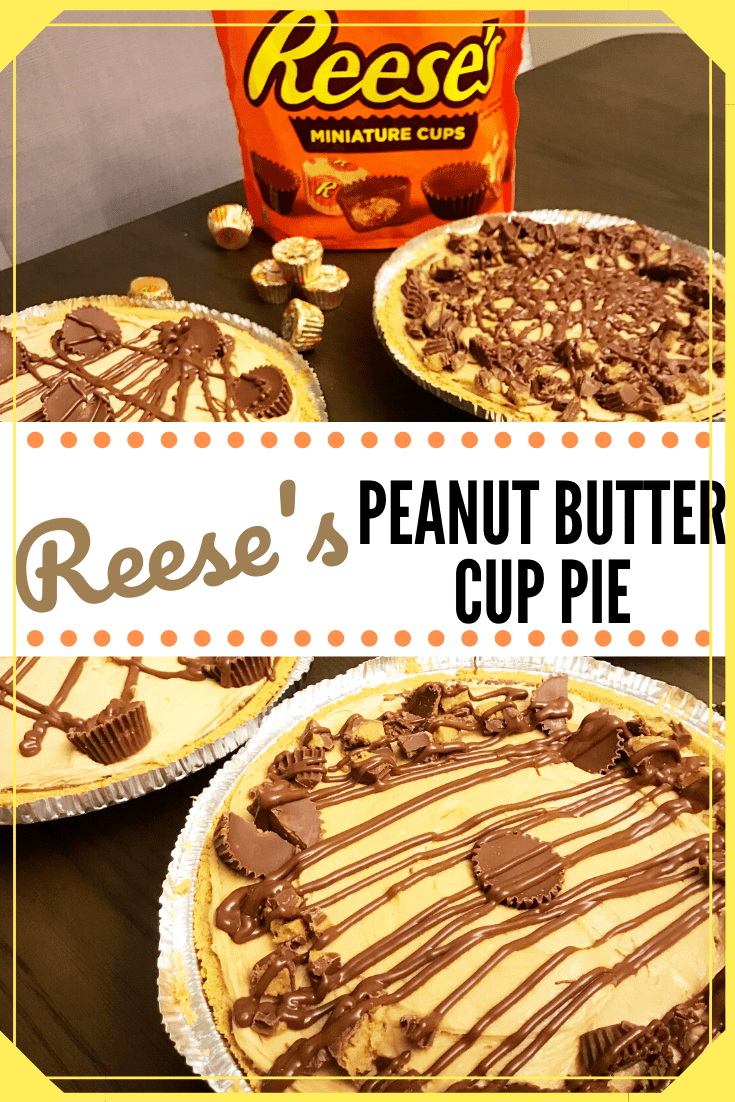
This easy no bake pie recipe is great as a Thanksgiving make ahead dessert! This recipe makes three pies, so it’s meant to either be dessert for a crowd or a freezer-ready make ahead pie.
I can’t believe it’s taken me this long to share this recipe. I really should have made this post sooner, because then I could be handing out the link to the recipe rather than reciting it at every family gathering! This is my most requested recipe, ever.
Everywhere I bring this pie, people fall in love. I even pay our dog sitter with this pie! He is my sister-in-law’s dad, but he seriously gets so giddy and eats the entire thing himself. He’s awesome.
This is our go-to make ahead pie recipe that is perfect for both Thanksgiving and Christmas. I usually make a batch before Thanksgiving and put it in the freezer to serve again at Christmas. It’s really welcome at any gathering.
So now it probably won’t shock you to find that this recipe makes three pies. You’re probably thinking:
- Who needs THREE pies?
- I don’t have time to make THREE pies!!!
- Where will I find enough people to eat this much pie?!?
Here are my answers:
- You do. Trust me. They will get eaten.
- It took me less than 1 hour to make these pies AND take the pictures of them. This is a simple, no bake recipe to feed a crowd.
- Everyone who tries it will have more than one piece. Also, you can freeze the leftovers for a delicious treat anytime!
This post contains affiliate links, which means if a purchase is made through the links I may receive a small commission at no additional cost to you. Thank you for supporting These Hungry Kids Blog!
Make ahead Reese’s peanut butter pie
This peanut butter pie stores great in the freezer for up to two months. It should be stored in the refrigerator until right before serving since it does have cool whip and cream cheese.
That means you can make this pie in October and it will last through Thanksgiving and Christmas. It’s so simple!
No bake peanut butter pie: recipe tips & instructions
How to keep graham cracker crust from cracking
I use store bought graham cracker crusts. I like that it’s no fuss, and it comes in its own container with a lid. That way when I bring the pie somewhere, I don’t have to worry about getting my pie plate back. You could totally make this recipe with a homemade graham cracker crust.
Graham cracker crust tends to fall apart easily, especially with such a thick filling. I resolve this issue by first coating it with a thin layer of chocolate.
To prepare the crust, melt chocolate with coconut oil, and generously pour over each crust. With the back of a spoon, spread the chocolate around to cover all of the crust.
Can I skip this step?
Sure, but it holds the crust together when you’re spreading the filling in, and it gives the crust a really nice crunch. It’s a necessary step for me.
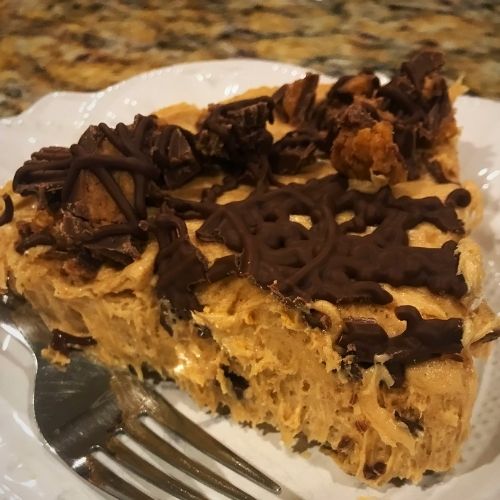
Making peanut butter pie filling
Let the chocolate cool over the crust while you prepare the filling. I throw my pie crust in the freezer for a few minutes to harden while the filling is mixing.
I recommend dumping everything into the stand mixer and letting it run for a few minutes. If you don’t have a stand mixer, you can do this with a handheld one, but it’s a little messier.
Spread the filling evenly between the pies. Start with one scoop at a time until the filling is gone, then spread within the pie crust.
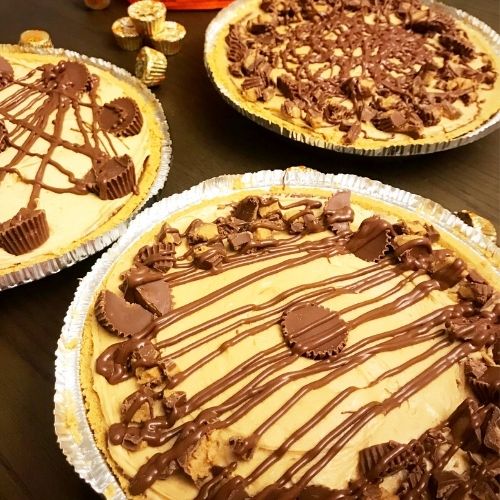
Decorating the peanut butter pie
I like to make each pie different, mostly because I think it’s fun.
My go-to is chopping up some Reese’s Peanut Butter Cups and sprinkling them over the pies with melted chocolate. You’ll melt chocolate with oil the same way as when you covered the crusts and decorate to your heart’s desire.
Helpful decorating tip:
After you melt the chocolate for the drizzle on top, pour it into a ziplock bag. Cut the corner of the bag off and squeeze chocolate through the hole. This gives nice, even drizzles and you can just toss the bag when you’re done.
Looking for more great dessert recipes? Try Pumpkin Spice Cookies With Cream Cheese Frosting, Strawberry White Chocolate Cake Mix Cookies or The Ultimate Peanut Butter Chocolate Bars!
I think this is the third chocolate peanut butter recipe I’ve posted in the past few weeks. It’s such an easy combination, and it’s such a hit!
Let me know if you try it!

Reese's Peanut Butter Cup No Bake Pie
This is a great make ahead dessert for Thanksgiving or Christmas! This recipe makes three pies that store well in the freezer for future use.
Ingredients
- 1 1/2 cups milk chocolate chips, divided
- 1 1/2 tbsp. coconut oil or vegetable oil, divided
- 3 store-bought graham cracker crusts
- 3 1/2 cups powdered sugar
- 3 cups creamy peanut butter
- 16 oz. frozen whipped topping, slightly thawed
- 12 oz cream cheese, softened
- 1 tbsp. vanilla
- Reese's peanut butter cups (to decorate with)
Instructions
- Melt 1 cup of milk chocolate chips with 1 tbs of oil in the microwave in 30 second increments, until mixture is melted and there are no lumps. Divide melted chocolate evenly over graham cracker crusts. Spread to all edges and allow to cool completely.
- Combine peanut butter, cream cheese, whipped topping, powdered sugar and vanilla in stand mixer. Scrape down sides and continue mixing until well combined. When chocolate on crust has hardened, divide filling evenly between the three crusts. Smooth down with spatula or the back of a spoon.
- Melt the remaining chocolate and oil in the microwave in 30 second increments, until chocolate is melted with no lumps. Drizzle chocolate over pies and top with Reese's peanut butter cups. Store in the refrigerator or freezer until ready to serve. Enjoy!
Notes
To store in freezer: Cover pies and store in the freezer for up to two months. Allow to thaw in the refrigerator before serving.
To make it gluten free. Use a gluten-free pie crust and the recipe is good to go!
Recommended Products
As an Amazon Associate and member of other affiliate programs, I earn from qualifying purchases.


Nutrition Information
Yield
24Serving Size
1/8 slice of pieAmount Per Serving Calories 550Total Fat 36gSaturated Fat 14gTrans Fat 0gUnsaturated Fat 18gCholesterol 17mgSodium 322mgCarbohydrates 50gFiber 3gSugar 33gProtein 10g
Nutrition values are approximate.